Tips on Making Quality Video Recordings
Making video is an iterative process and building up your media skills takes time. You might make a mistake or two and find that you must re-record. The more you make video the easier it gets. Below are some common do’s and don’ts in video production.
To record, you’ll need:
- A webcam – most laptops/computers have a webcam built in. This will work fine.
- A microphone – audio is arguably the most important element of your video. Bad audio will stop us from viewing it. A microphone plugged into your computer is often significantly better than using the microphone built into your laptop.
- Visuals aids – a PowerPoint slide deck is a great way to capture visuals along with your video. The Panopto Video platform that is available in Brightspace is ideal for this purpose.
Elements of Video

Audio
Audio is the most important element in your video, if we can’t hear you clearly, we don’t watch. Be sure to:
- Record in a quiet place
- Use an external microphone
- Record a test & listen back to check the audio quality
- Project your voice and speak (don’t read) your script
Lighting
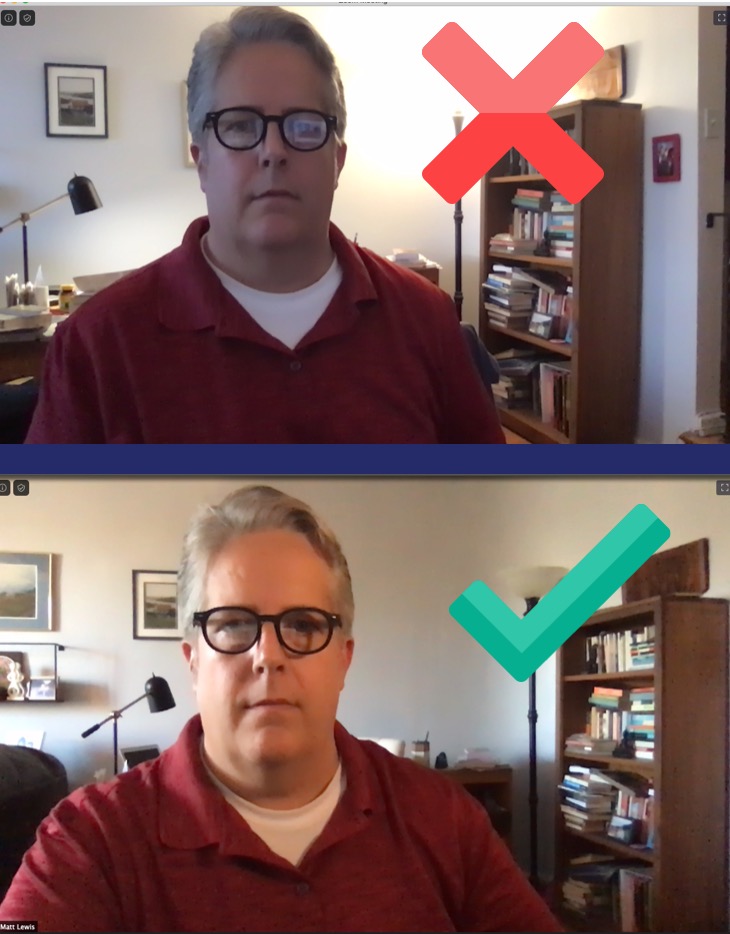
A well-lit video means a higher quality image. When recording think, “find my light,” and be sure to:
- Position the brightest light source so it’s on your face (not behind you)
- Move yourself or the light(s) to “find your light”
- Pro tip: Natural light produces best result, it’s warmer
- AVOID strong backlight
- Note, your computer monitor is also a light source
Shot Composition
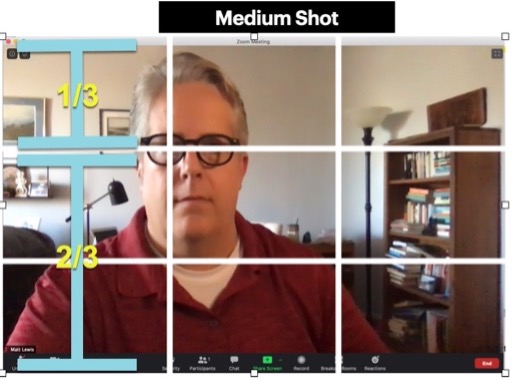
Be mindful of your shot composition. We highly recommend a “medium shot,” where you fill the frame from the top of your head to about chest level.
- Adjust your camera so your eyes intersect the top third (left, right, or centered)
- Note, shot composition influences the meaning of your video. See 6 Keys for Quality Videos.
Eye Line
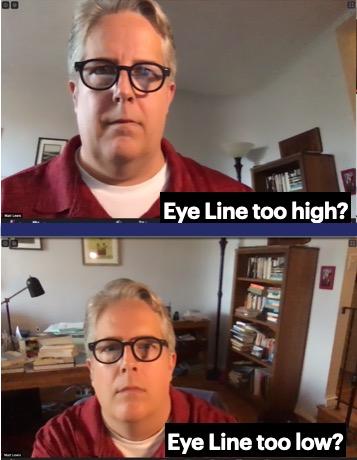
Consider your eye line. You can create a connection with your audience by looking into the camera lens. It’s like making eye contact when face-to-face.
- Look directly into the lens of camera as much as possible
- Adjust the height of your camera (or yourself) so your eye line is EQUAL to the camera lens
- Avoid having your eye line looking up or down at hard angles
- Hard angles convey a negative message to your audience
Background

Consider your surroundings. Some tips on backgrounds are:
- Create some depth
- Give your audience something to look at (besides you)
- White walls tend to be a little boring
Still have questions? Email us at FacultySupport@sps.cuny.edu. We’re here to help!
Was this helpful?
5 / 0
[…] looking for remote support, the OFDIT Media Team can help. They will consult with remote faculty to make high quality recordings, offer advice on which recording software to use, and will assist with creating visuals, editing, […]
[…] looking for remote support, the OFDIT Media Team can help! They will consult with remote faculty to make high quality recordings, offer advice on which recording software to use, and assist with creating visuals, editing, […]