Quizzes and tests can serve as key tools for gauging students’ progress and their attainment of learning outcomes and course objectives. Quizzes can provide ongoing insights into student understanding (formative assessments) and can be used to evaluate cumulative knowledge (summative assessments). This unit will guide you through the essentials of the Brightspace Quizzes tool and basic steps for creating quizzes in Brightspace.
Note that this unit includes instructions for commonly used quiz options beyond the essentials. For a quick introduction to the Quizzes tool in Brightspace, you can read the how-to sections through “Make the quiz available and save it.”
Glossary
Quizzes
The Brightspace tool for managing quizzes, tests, and exams. You can create, edit, and grade quizzes, track student performance, and even do item analysis from the Quizzes tool. All quizzes in Brightspace “live” in the Quizzes tool, even those that you create from Content Modules.
Question Library
Accessed from the Quizzes tool, the area to manage, create, edit, and organize test questions. Imported question banks will be found in the Question Library.
Question Pool
An option when creating a quiz in Brightspace that allows you to define a set of questions and then randomly draw from that set for each student’s version of the quiz.
Quick Tips
Use the Question Library
Folders in the Question Library can be copied into or from other courses, selected for pools when creating a quiz, and edited all within the Question Library.
Design to support academic integrity
Utilize Brightspace’s pools, question randomization, time limit and display features to support academic integrity in online tests.
Test higher-order learning
For summative assessments, measure significant learning and ensure that each student’s work reflects their own knowledge and skills by creating questions that require analysis, synthesis, and evaluation of content in the specific context of your course.
How to
Access the Quizzes tool
The Quizzes tool in Brightspace is where you can manage all the quizzes in your course, manage your question library, and see statistics related to quizzes including student performance and item analysis. You can always access Quizzes from the navbar or from your Course Admin panel.
Option A – From the Navbar
- Click on Activities on the top navbar and choose Quizzes.

Option B – From Course Admin
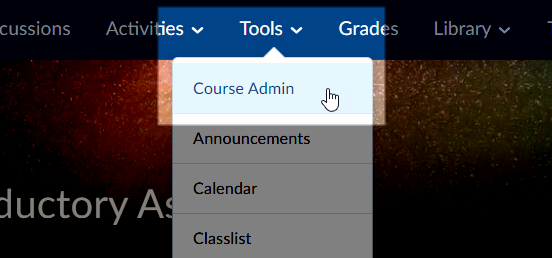
- In the Tools menu on the navbar, click on Course Admin.
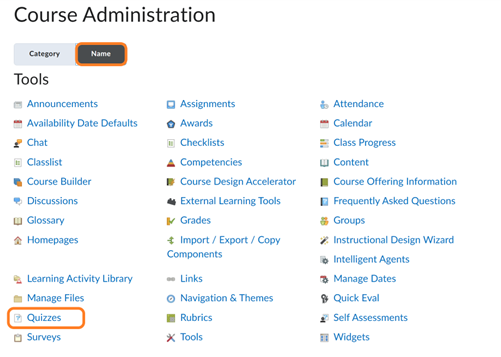
- Click on the Name tab to sort alphabetically.
- Click on the Quizzes link.
Create a new quiz
Option A – From Quizzes
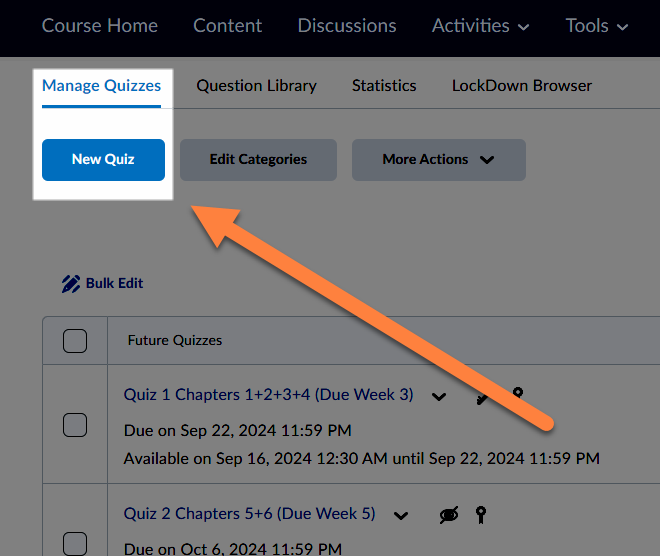
The Quizzes tool opens on the Manage Quizzes screen.
- Click on the New Quiz button.
Option B – From Content
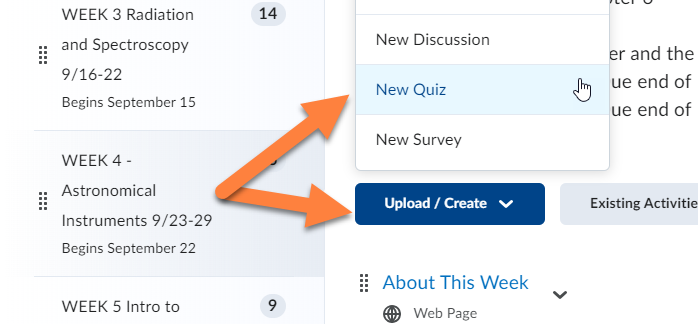
- Click on the Content link from the top navbar.
- Navigate to the module where you would like to add a quiz.
- Click on Upload/Create and select New Quiz from the dropdown menu.
Note: When you create a quiz from a content module, it will automatically be stored in the Quizzes tool. In future, you will be able to manage it from the Manage Quizzes tab in the Quizzes tool.
Set the quiz properties
When you click the New Quiz button, a window opens in which you can set up all of the properties of the quiz and all the optional settings.
- Type in the quiz title in the text box under “Name.”
- Enter the Due Date (optional).
- Describe the quiz and provide instructions to students.

Add questions and pools
From the quiz properties window, in the Questions section, you can create new quiz questions, select from existing questions in the course Question Library, or upload a file of questions. Any new questions you add here will also be saved in the course Question Library. You can also create a pool of questions to draw from randomly if there are already questions in the course Question Library.
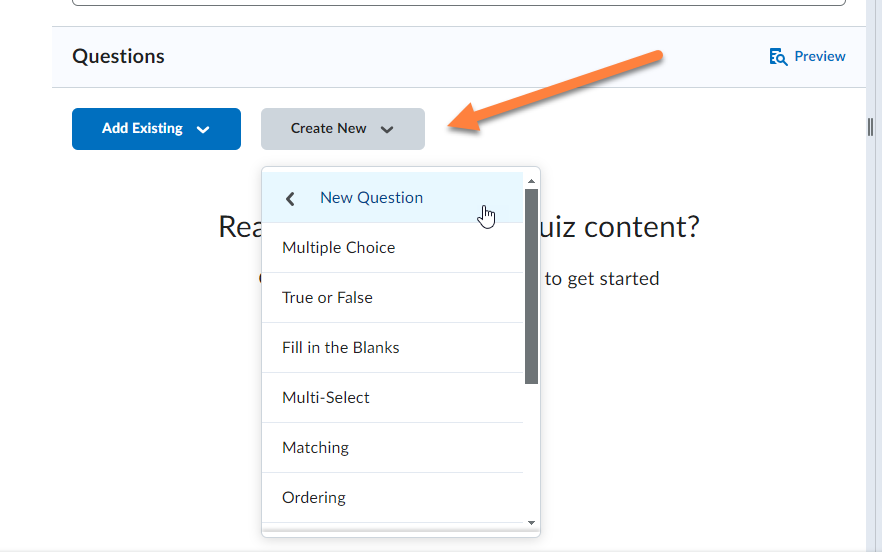
Create quiz questions
- Open the Create New menu.
- Select New Question.
- Choose the question type.
- Enter the question text, answers, and points, and save each question.
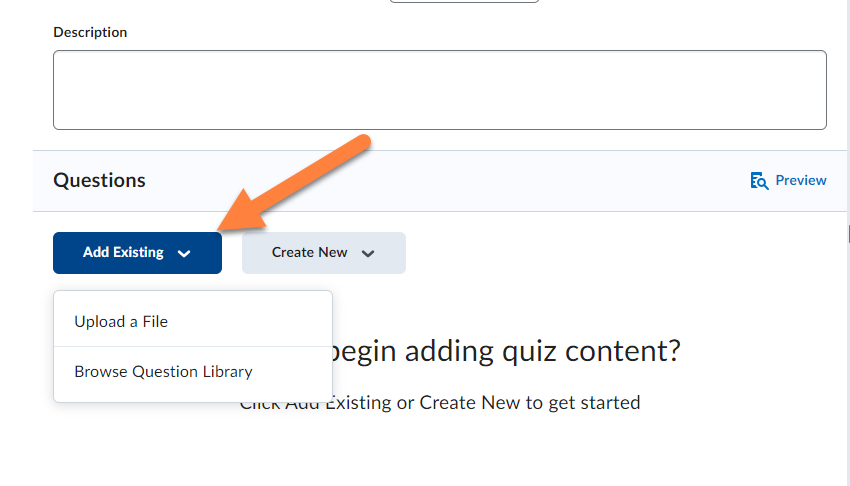
Add existing questions
From the Add Existing menu, select the option to Browse Question Library. This allows you to see all the questions in this course.
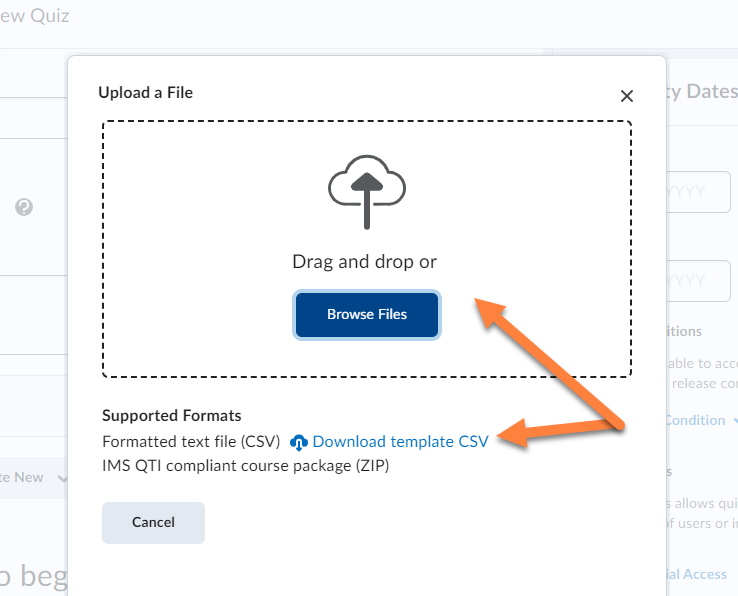
Upload a file of questions
From the Add Existing menu, select the option to Upload a File. You will see a template file that you can download and use to create the file of your new questions.
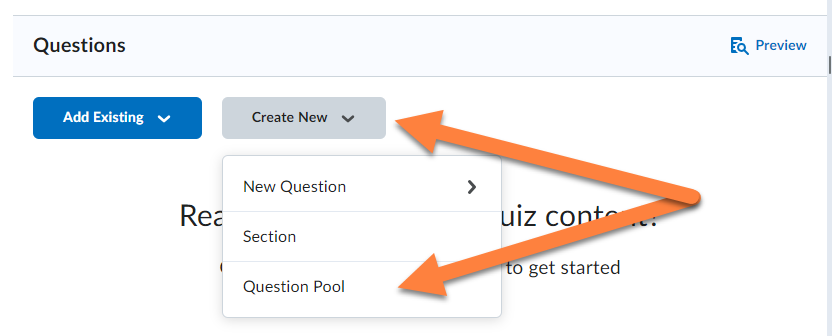
Create a question pool
- Open the Create New menu.
- Select Question Pool.
In the New Question Pool dialog box,
- Give the pool a title.
- Set the number of questions to draw from the pool.
- Browse the Question Library to select the questions to put in the pool.
- If necessary, adjust the points per question.
- Save the pool.
Note: All the questions in a pool must have the same number of points. You won’t want to mix higher value questions with lower ones in the same pool.
Set the quiz grading criteria
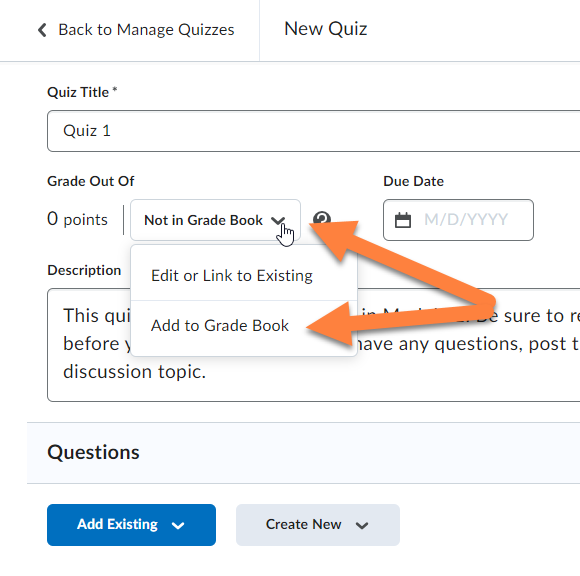
To include the quiz in final grade calculations, you must add it to the gradebook. Open the menu that says, “Not in Grade Book,” and select the option to add it to the gradebook.
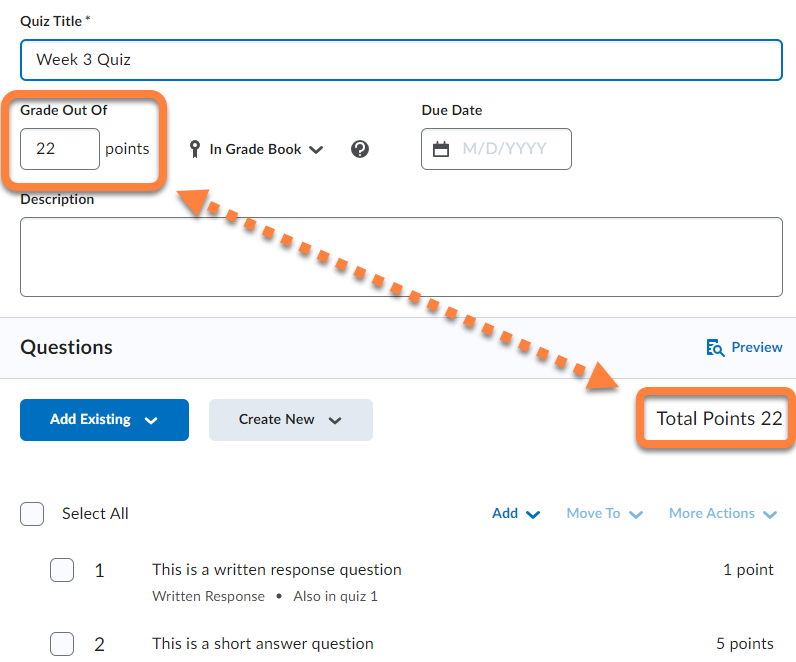
Once you’ve added questions, the total points possible for the questions will automatically appear in the “Grade Out Of” field. If you would like the total points for the quiz in the gradebook to be different from the total points for the questions, you can edit that field.
Preview the quiz
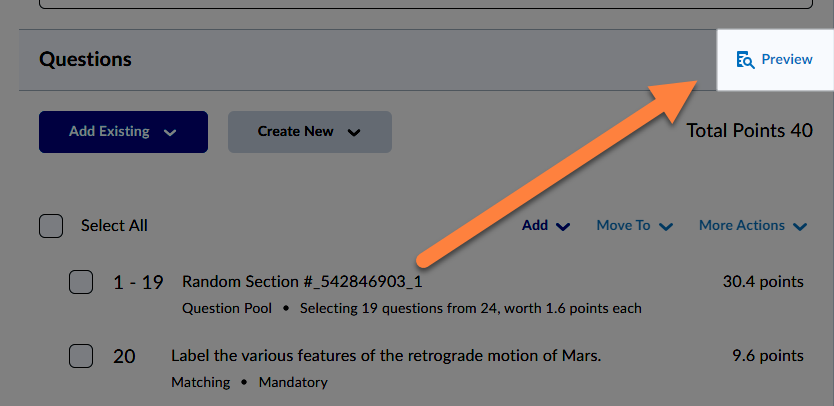
Once you have added some questions, you can preview the quiz by clicking the preview button in the Questions sections of the quiz setup window.
Make the quiz visible to students and save it
- Click on the Hidden/Visible toggle button at the bottom of the window to control whether the quiz is visible to students in their Quiz tool and/or course content in Brightspace.
- Be sure to save the quiz settings before you close the window!
Note: The quiz is by default hidden from student view, and if not set to the visible option, students will not be able to see it.

Restrict quiz availability
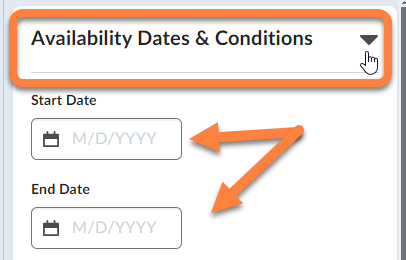
- Click on Availability Dates & Conditions to open the section.
- Set the Start and End Dates/Times to define the start and end points of the quiz for students.
Note: The quiz must be set as visible to students for the availability date restrictions to work properly.
Enable multiple quiz attempts
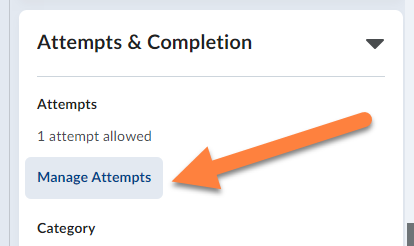
Brightspace quizzes are set to “1 attempt allowed” by default. If you wish to allow students to retake the same quiz multiple times,
To allow multiple attempts,
- Expand the Attempts & Completion section of the quiz options panel.
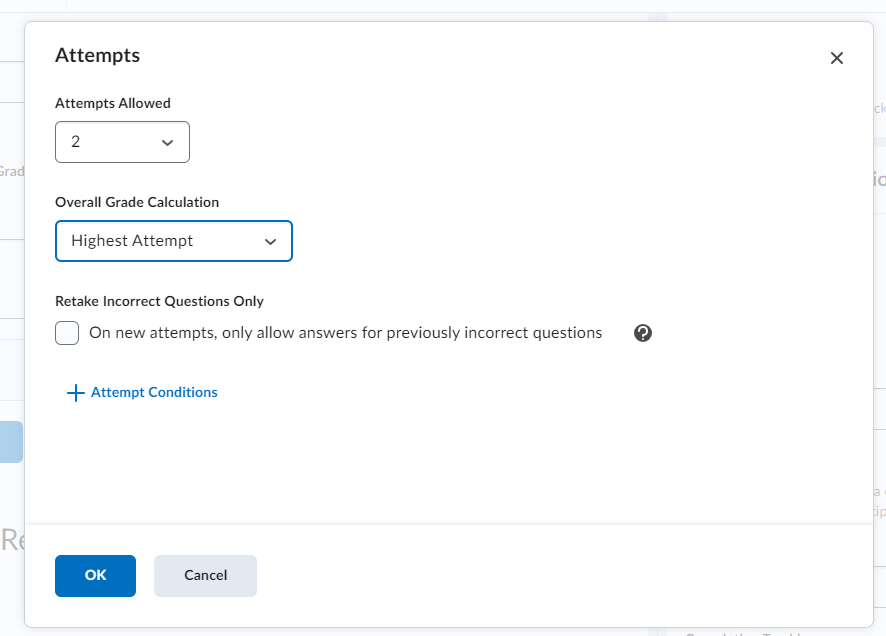
- Click on Manage Attempts to open the Attempts window.
- In the Attempts Allowed menu and select the desired number of attempts.
- Define how the grade will be calculated for the multiple attempts using the Overall Grade Calculation menu.
- Click OK to save the new settings.
Note: If you allow multiple attempts, you may also want to adjust the Evaluation & Feedback options to display different feedback to students after each attempt.
Set Evaluation & Feedback options
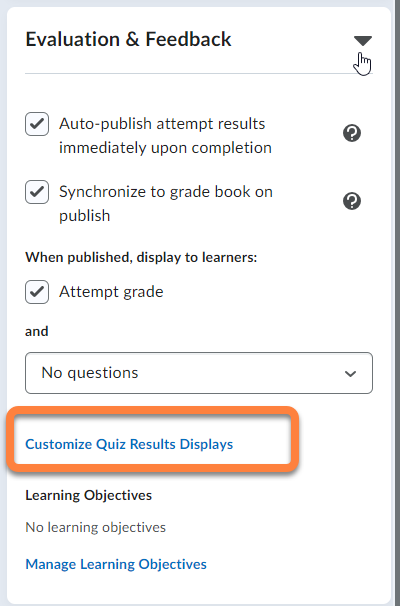
By default, a new quiz will be set up to automatically release the results to students as soon as they complete it, with no specific information about how they did on individual questions. In most cases, the default settings will be appropriate, but to change these settings, open the Evaluation & Feedback options pane.
Note: If you have allowed multiple attempts, you will likely want different feedback display settings for the different attempts. To set this up, click on Customize Quiz Results Displays to adjust the feedback for each attempt.
Extensions, additional attempts, extra time
- Click on Availability Dates & Conditions to expand the section.
- Click on Manage Special Access under the Special Access heading.
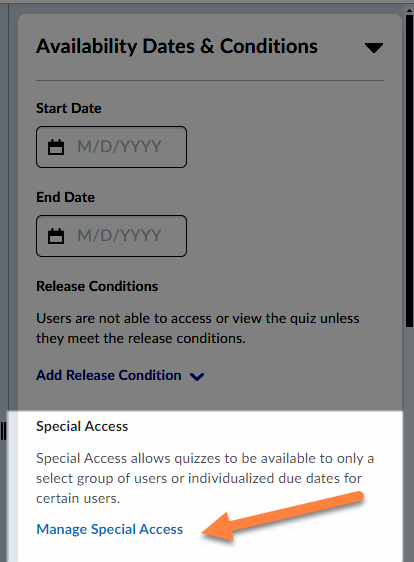
A new window pops up. You may choose between allowing special access to selected users to set accommodations for individual students, including allowing additional attempts, or you can restrict access to the quiz to a specific student or group.
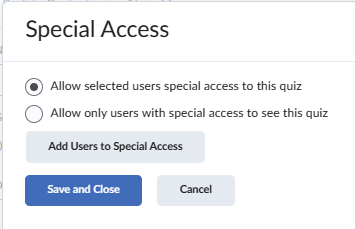
Allow selected users special access to this quiz. This option allows you to give certain students different submission options from the rest of the class. For example, you can change the start date, due date, and end date, allow more time on a quiz, or allow multiple attempts on a quiz for these selected students. The rest of the class will still have access to the quiz based on the rules you set globally.
Allow only users with special access to see this quiz. With this option selected, only the students you add to the special access list will be able to do the quiz. The rest of the class will not have access to the quiz. This could be useful in situations where a quiz is designed for a specific group of students or for individualized instruction.
Edit a quiz
From the Edit Quiz window, you can edit all the properties and settings for the quiz, including special access settings to provide students with additional attempts or other accommodations.
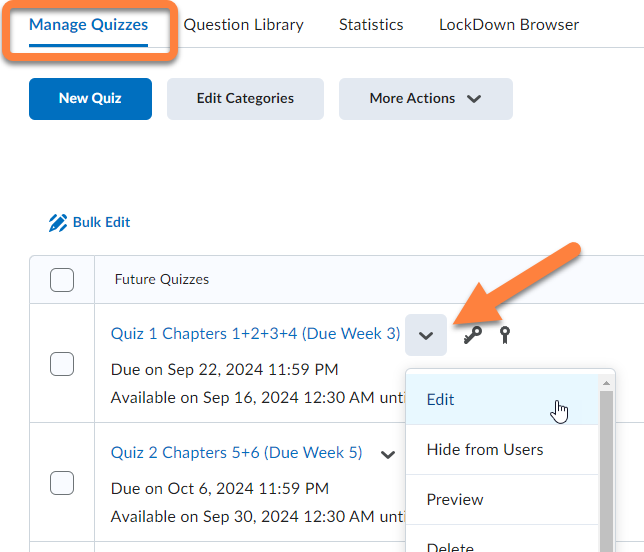
- Navigate to the Quizzes Tool.
- On the Manage Quizzes tab, you will see a list of all the quizzes in the course.
- Open the menu for the quiz you would like to edit from the chevron at the end of the quiz name.
- Select Edit.
Note: If you’ve created a quiz in a content module, or even added a link to an quiz in a content module, you can also edit the quiz from that module.
Link to an existing quiz from a content module
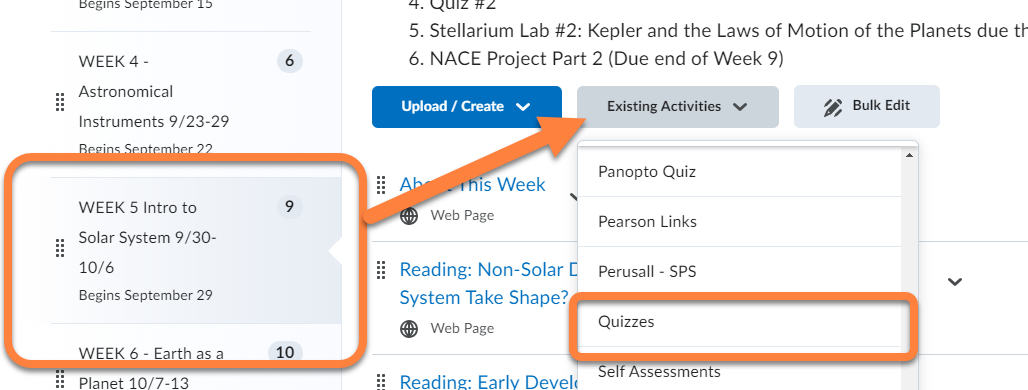
If you have created a quiz in the Quizzes tool, it will not be displayed anywhere else unless you link to it. To insert a link to an existing quiz from a content module:
- Navigate to the module.
- Open the Existing Activities menu.
- Select Quizzes.
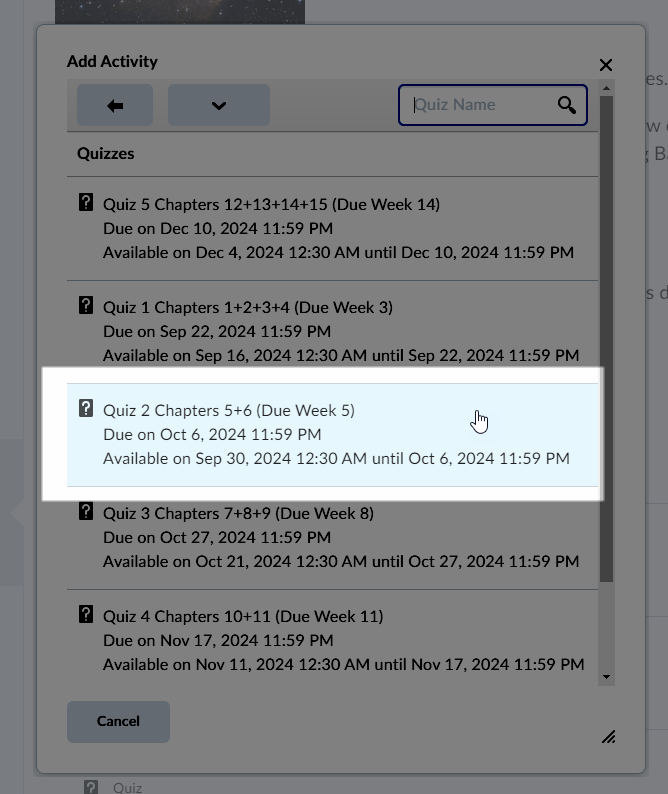
- Select the quiz you would like to link to. It will be inserted immediately, without a confirmation screen.
Use quiz settings to support academic integrity
Various quiz settings can support academic integrity in online quizzes and tests. These include using time limits, controlling the display and navigation of questions, randomizing the order in which questions are presented, and randomizing the order of answer options for multiple choice questions. Limiting time and prohibiting backtracking can negatively impact student performance and create additional pressure on students, so you will want to consider whether these measures are pedagogically appropriate for the quizzes or tests you administer.
Add a time limit
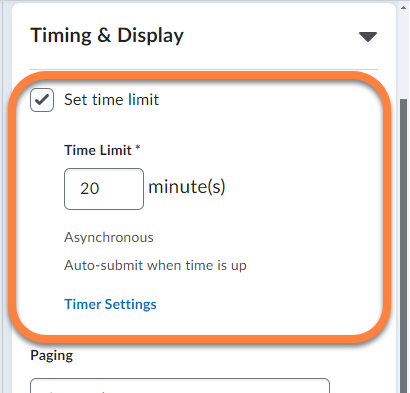
- Click on Time & Display to open the section.
- Check the box next to the Set time limit.
- Enter the time limit in minutes.
- Open the Timer Settings, which will appear when you set a Time Limit, to decide when the timer will start and what will happen when the time limit expires.
Consider the display of questions
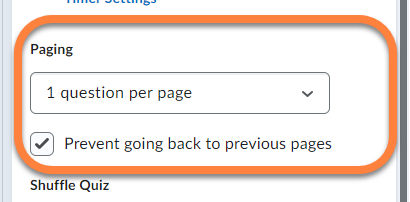
Setting questions to display one at a time can help prevent breaches of integrity, such as printing quizzes, as can setting pages up so that students cannot go back to previous questions. Note that these settings might not be compatible with your objectives for formative assessments.
- In the Time & Display settings, scroll to Paging.
- Select how the questions will display. There are several options, including all questions displayed or one question per page.
- Tick the box to prevent going back to previous pages. This option is not available if you display all questions together on one page.
Randomize answer choices
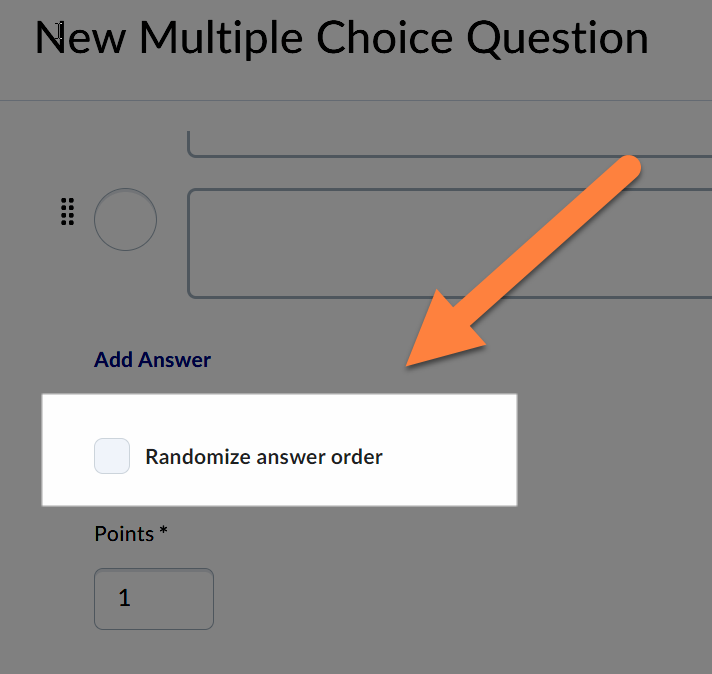
To discourage students from cheating on quizzes with multiple-choice and multi-select questions, you can randomize the presentation of the answer choices for each question, so the correct answer(s) are in a different order for each student.
To randomize answer choices in multiple-choice and multi-select quiz questions, when you set up the new multiple-choice quiz questions, tick the box to “randomize answer order” below the answer options.
Test Your Knowledge
Take Action
In your practice site, create a formative quiz for your course utilizing multiple attempts. Set up its start date and time. Try experimenting with other settings to see how the quiz displays.
Resources
Text
Brightspace Community: Create and configure a quiz
Brightspace Community: Provide a random set of quiz questions
Brightspace Community: Randomize the answer choices in multiple choice and multi-select quiz questions
Brightspace Community: Manage quizzes with learner attempts
Video
Create a Quiz
New Quiz Experience
Create a Randomized Set of Quiz Questions
Customize the Quiz Results Display
Synchronize Quizzes for Learners