Grading rubrics are helpful in guiding students in their work because they help convey what is important about an assignment. Grading with rubrics promotes transparency, fairness, and consistency in grading, especially when used with the anonymous grading option, and allows instructors to provide concrete, actionable feedback based on the rubric criteria.
The Brightspace Rubrics tool includes two rubric types: analytic and holistic. Analytic rubrics have the assessment criteria on separate rows and levels of achievement as columns, the classic grid rubric. Holistic rubrics are used to assess learners’ overall achievement on an activity or based on predefined achievement levels. They are one-dimensional in that they only include one criterion: overall achievement.
Glossary
Analytic Rubric
A table or grid of scoring criteria categories, such as “Analysis”, “Argumentation”, or “Cohesion”, and achievement levels, such as “Proficient”, “Competent”, or “Developing”.
Holistic Rubric
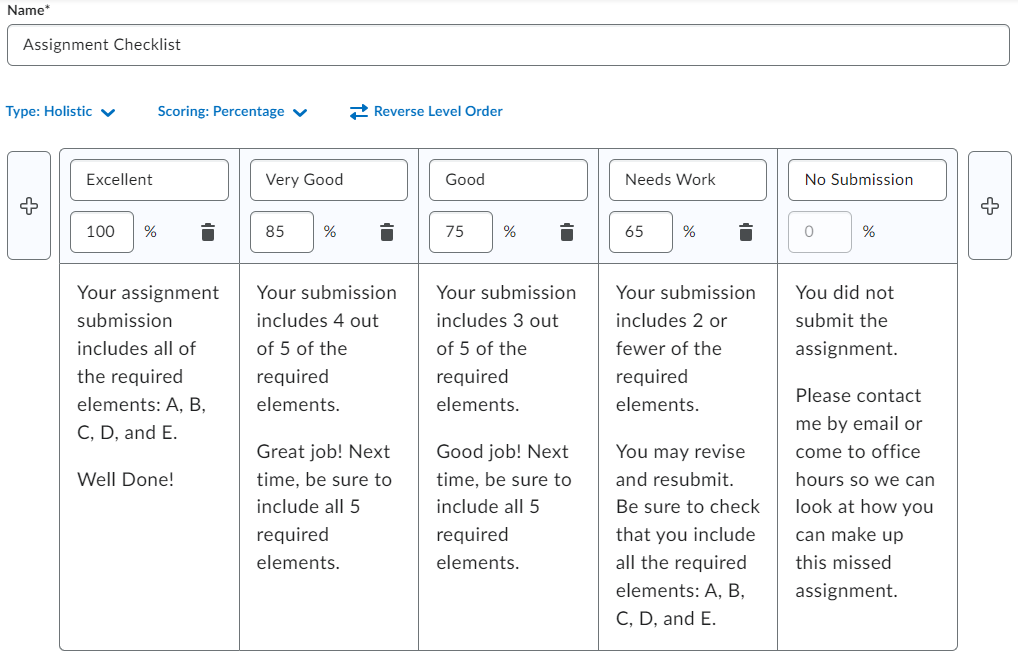
A one-dimensional Brightspace rubric with a single criterion, overall performance, and predefined achievement levels. Can be used to create a grading checklist.
Overall Score
A single row at the bottom of every analytic rubric in Brightspace that shows overall achievement based on the total points given when an instructor completes the rubric for a student submission. The overall score levels of achievement ideally correspond to the grading scheme for the course.
Quick Tips
Check the Overall Score settings
The overall score should make sense relative to the grading scheme for the course and the score ranges for the levels of the rubric. If they don’t, consider recalibrating the points assigned to the different achievement levels in the rubric.
Rubric Locked!
Once a rubric has been used for grading, it becomes locked. It is possible to edit the language/text of a locked rubric, but not to alter the criteria, group, level, or point structure. Changes to the language of a locked rubric will apply to all past and future assessments that use the rubric in question.
Group Criteria
You can create groups of criteria within a rubric. For example, you might have a group for content-related aspects, another for citations and APA or MLA styles, and another for spelling and grammar.
How to
Access the Rubrics tool
- Open the Tools menu on the navbar.
- Select Course Admin.

- Sort tools by name to list them alphabetically.
- Select Rubrics

Create a rubric
You can create a new rubric from the Rubrics tool or from an assignment or discussion topic.
Option A – From the Rubrics tool
On the Rubrics tool page, select New Rubric.

Option B – From an assignment or discussion topic
You can create a new rubric from any graded item that has rubric grading as an option in its Evaluation & Feedback panel.
- Expand the Evaluation & Feedback panel.
- Open the Add Rubric menu.
- Select Create New.

Set rubric properties
- Name your rubric.
- By default, a new rubric will have the status “Published” and will be saved automatically as you edit it. You won’t have to save it or publish it when you are finished creating it. Since students cannot see a rubric unless it is attached to an activity that they have access to, you can leave this setting as is. If you prefer, you can change the status of the rubric to “Draft” while you are working on it. You will have to remember to publish the rubric when you are done.

- Choose the rubric Type:
- An analytic rubric allows you to include multiple criteria, with achievement levels scored by points. This is the most common rubric type.
- A holistic allows for a single criterion and can be used to create a grading checklist, with achievement levels scored by percentage.
- Both rubric types can be set to “no score”, text-only feedback to students.

- Choose the Scoring method:
The Scoring drop-down menu provides the options for the rubric type you’ve selected.
- Points scoring allows you to set the point value for each achievement level. The point value is the same for each level for every criterion.
- Custom Points allows you to set different total point values for each criterion and different point scales within criteria. This allows you to build weighting into your rubric by making content-related criteria worth more points than mechanics-related criteria, for example.

- No Score means that no point values are set in the rubric. Rubric feedback to students will be text only.
- Percentage scoring is only an option for holistic rubrics. To create percentage scoring for an analytic rubric, set the maximum points for each criterion so that they add up to 100 total.

If there is no space between the details title and the first step, hit return to add an additional space.
Define criteria (analytic rubric)
When you create a new analytic rubric, it will include three criteria on three rows. You can add additional criteria and create groups of criteria.
- For each criterion in the new rubric, select the text for the name of the criterion and rename it with a descriptive, explanatory name, such as “Content Development” or “Sources and Evidence”.

- You can add rows with the + Add Criterion button.

- You can group criteria, if you wish, for example to distinguish between content-related and form-related criteria, by using the Add Criteria Group button. For a points rubric, criteria groups can have different scoring schemes.

Define levels
- When you create a new rubric, it will default to including four levels in columns. You can define these levels and/or add columns for additional levels on either end of the scale. You can also reverse the order of the levels.
- Define each level by selecting its name and replacing it with a meaningful indicator of the level in whatever scale you are using.
Note: Some examples of meaningful scales are, exemplary > proficient > developing > unsatisfactory, excellent > good > needs improvement > unacceptable, or A (18-20 points) > B (16-17 points) > C (14-15 points) > D/F.

- Use the plus signs at either end of the scale to add a new level before the first column or add a new level after the last column.

- To reverse the order of the columns, use the Reverse Level Order button.

- For analytic rubrics with points or custom points scoring and for holistic rubrics with percentage scoring, define the points or percentage for each level of the rubric. For custom points rubrics, repeat this step for each criterion.

- Add a description for each level of each criterion that explains to students how to fully satisfy the requirements of each.
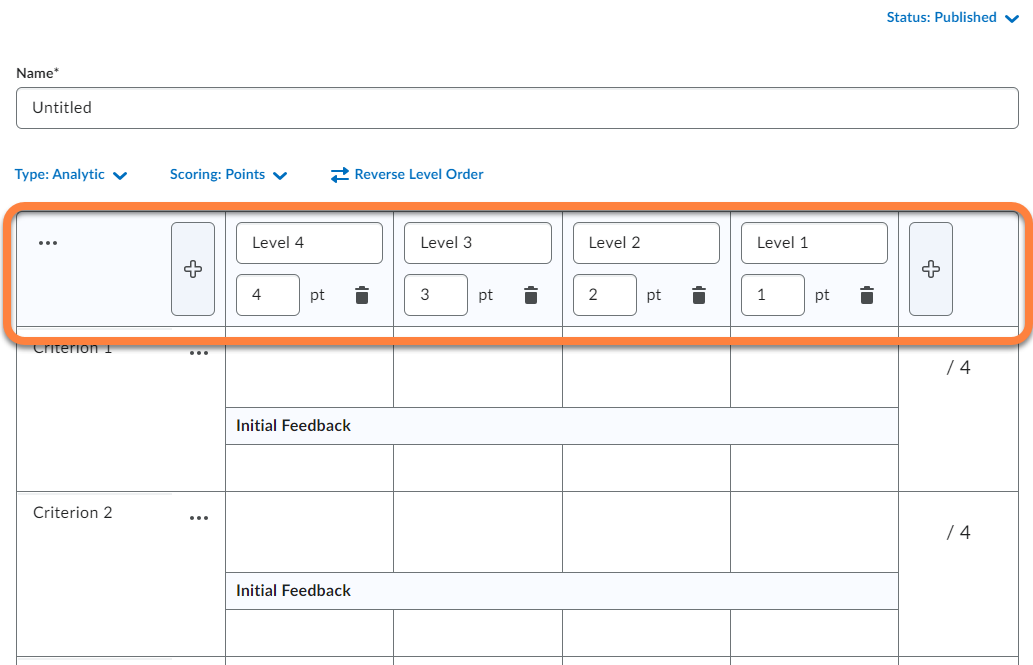
- Optionally, for analytic rubrics, add Initial Feedback for each level of each criterion. This feedback will be visible to students, along with any more specific comments added when grading.

Adjust the Overall Score (analytic rubrics)
Analytic rubrics in Brightspace include an additional row called “Overall Score” that it calculates automatically based on the student’s total rubric score. The Overall Score row cannot be hidden or deleted, so you will want to check that the point ranges and the names of the achievement levels make sense with your rubric and grading scheme.
- Check the names of the levels. Add levels before the first column or after the last column as needed.
- Check the point range for each level and adjust as necessary.
- You may add general feedback to each cell if you wish.
For example, in the Overall Score row pictured here, 92.5 points or more (out of 100) corresponds to the level ‘Accomplished’, 80-92.5 is ‘Proficient’, 67.5-80 ‘Developing’, 30-67.5 ‘Beginning’, and 0-30 points ‘No Credit’. A student with a total score of 82 points on the rubric for this assignment will see the level ‘Proficient’ on the Overall Score row when they open the rubric to see your feedback.

Set rubric visibility
By default, rubrics in Brightspace are set to be visible to students. If you would like to change the visibility settings for a rubric, you can do that in the rubric options.
If students report that they cannot see a rubric that they should have access to, first check that the rubric status is “Published” and not “Draft” or “Archived”. Next, you can check the visibility settings in the rubric options.
To access the rubric visibility options, expand the Options section at the bottom of the rubric editing window. You can adjust when students see the rubric and whether they see the rubric scores.

Associate rubrics with assignments or discussion topics
If you create a rubric from a discussion topic or assignment, it will automatically be associated with the topic or assignment where you created it. It will also be added to the course rubrics so that you can associate it with other assignments or discussion topics.
In the Rubrics tool, if a link icon is displayed next to the rubric’s name, it is associated with at least one assessment. To see which assessments a rubric is associated with, open its dropdown menu and select View Statistics.
If you create a rubric in the Rubrics tool, you will have to edit the assessments that you want to use it for and add it to the Evaluation & Feedback options.
- Navigate to the assignment or discussion.
- Select Edit from the item’s menu.

- Open the Evaluation & Feedback panel.
- Select Add Rubric.
- Choose Add Existing.

- From the list of rubrics in the course, select the one you would like to use.
- Scroll to the bottom of the list and choose Add Selected.

Edit a rubric
You can edit a rubric if you haven’t yet used it to grade student work. Rubrics that have been used for grading are locked and cannot be edited, except to correct typos, clarify wording, and make other minor changes that do not affect the academic integrity of the rubric.
Editing a rubric will update it everywhere in the course that you are using it. When you associate a rubric with an assignment or discussion topic, it is associated by a link, not a copy, so when you edit the rubric, it will be updated in every assignment or discussion topic that it is associated with.
You can edit rubrics only from the Rubrics tool, which you access from the Tools > Course Admin link on the navbar. In the rubrics manager, you can access all the rubrics in the course.
- Open the dropdown menu for the rubric you would like to edit.
- Select Edit.
- The rubric setup page opens.
- Make the changes and click Close. The edits are saved automatically.

Print a rubric
Rubrics can be printed from the Rubric Preview window.
Note: In Brightspace Assignments, the rubric will be visible to students in the assignment instructions. To provide students with access to the rubric in any other type of Brightspace item, such as a discussion topic, a module overview, or in the course information module, you can use the Insert Quicklinks tool on the Brightspace Editor toolbar to insert a direct link to a preview of the rubric. For accessibility reasons, and to ensure that all copies of a rubric include the most current updates, we recommend this method of sharing the rubric with students rather than printing or saving it as a file.
- Navigate to the Rubrics tool from Tools > Course Admin on the navbar.
- Open the dropdown menu for the rubric you would like to print.
- Select Preview.


- You will be asked to choose a printer, save as PDF, or choose another application to save the rubric.
- You can also adjust other settings such as the layout, page size, and scale.
- Select Print or Save, depending on your printer selection, at the bottom of the printing dialog box.
Tip: Often rubrics are easier to read in landscape layout than in portrait layout.
Change the status of a rubric
In the Edit Rubric window, you can change the status of a rubric from Published to Draft or Archived. Students cannot view the rubric if it is set to archived or draft. The different statuses for rubrics are:
- Published: published rubrics can be associated with assignments/discussions/projects.
- Draft: draft rubrics are not yet available for new associations.
- Archived: archived rubrics do not appear in default search results and cannot be added to activities.
To change the status of a rubric:
- Navigate to the Rubrics tool from Tools > Course Admin on the navbar.
- Open the dropdown menu for the rubric you would like to change the status of.
- On the Edit Rubric page, open the Status menu and select the new status for the rubric.

Copy a rubric
Copying a rubric creates a new rubric in the same course. The new rubric has the same properties, levels, and criteria, and sharing permissions as the original rubric. You can then edit it and associate it with graded items. Note that you do not need to make a copy of a rubric to associate it with multiple graded activities in Brightspace—you can associate a rubric with all of your weekly discussion topics, for example.
- Navigate to the Rubrics tool from Tools > Course Admin on the navbar.
- On the Rubrics page, from the context menu of the rubric you want to copy, select Copy.
- Now in your list of rubrics you will see one called “Copy of” and the name of the original rubric. Open the copy and edit the name and other sections.

Delete a rubric
- Navigate to the Rubrics tool.
- Select Delete from the dropdown menu for the rubric that you want to delete.
- You will be asked to confirm that you want to delete the rubric.

Link to a rubric in the Brightspace Editor
You can easily add links to rubric (and other course content) by using the Insert Quicklinks button in the toolbar of the Brightspace Editor. This is convenient if you would like to include the rubric for discussions in the instructions for a Discussion Topic, for example, or if you’d like to include the rubric for a capstone assignment in the Content Topic where you describe the project.

Test Your Knowledge
Take Action
- Try it out! Create a rubric and link it to an assignment in your Practice Site. Try changing from an analytic rubric to a holistic. Think about which type would best suit the different graded activities in your course.
Resources
Text
Brightspace Community: About Rubrics
Brightspace Community: Create a rubric using the Rubrics tool
Brightspace Community: Manage Rubrics through the Quicklinks menu
Video
Rubrics – Create an Analytic Rubric
Rubrics – Create a Holistic Rubric
Easily create and use the rubrics tool in Brightspace
Easily evaluate and assess students with rubrics in Brightspace